The Steam Deck is a gaming powerhouse, but even the mightiest warriors need more storage to hold their epic conquests. If you’ve ever found yourself staring at that dreaded “insufficient storage” message while trying to download the latest title, you know the struggle is real. Fear not! Upgrading your Steam Deck’s storage is easier than finding a hidden treasure in your favorite RPG.
Why Upgrade Steam Deck Storage
Upgrading the storage on a Steam Deck enhances gaming experiences significantly. Expanding storage capacity allows users to download more games and content without constant content management.
Benefits of Upgrading
Increased storage capacity enables the installation of larger games and updates. Enhanced load times occur with faster storage options. An upgraded storage solution can support more downloadable content and mods, expanding gameplay possibilities. Greater flexibility comes with improved organization, making it easier to access preferred games. Enhanced performance is common when using high-speed SSDs in gaming.
Common Limitations of Default Storage
Default storage options often limit the number of games that can be downloaded simultaneously. Capacity restrictions necessitate frequent deletions or offloading of titles. The slower read speeds of eMMC storage may lead to longer loading times compared to SSDs. Game updates can consume significant space, further complicating storage management. Compatibility issues may arise when attempting to use certain external storage devices.
Types of Storage Options

Upgrading the Steam Deck’s storage presents several effective options. Users can choose between SSDs, MicroSD cards, and NVMe drives, each offering unique benefits tailored to their gaming needs.
SSD vs. MicroSD
SSDs offer significantly faster read and write speeds compared to MicroSDs. Games load quicker with SSDs, enhancing overall responsiveness during gameplay. MicroSD cards, while more affordable, can be slower, impacting performance when running more demanding titles. Most players find SSDs ideal for their main game library, reserving MicroSD cards for less frequently played games or additional content.
NVMe Drives Explained
NVMe drives connect directly to the motherboard, delivering superior performance due to their high-speed capabilities. They outperform traditional SSDs, ensuring faster load times and smoother gameplay experiences. Upgrading to an NVMe drive allows users to maximize the Steam Deck’s potential, accommodating larger game files and reducing lag. Using NVMe also helps facilitate quicker updates and downloads, making it a preferred choice for dedicated gamers.
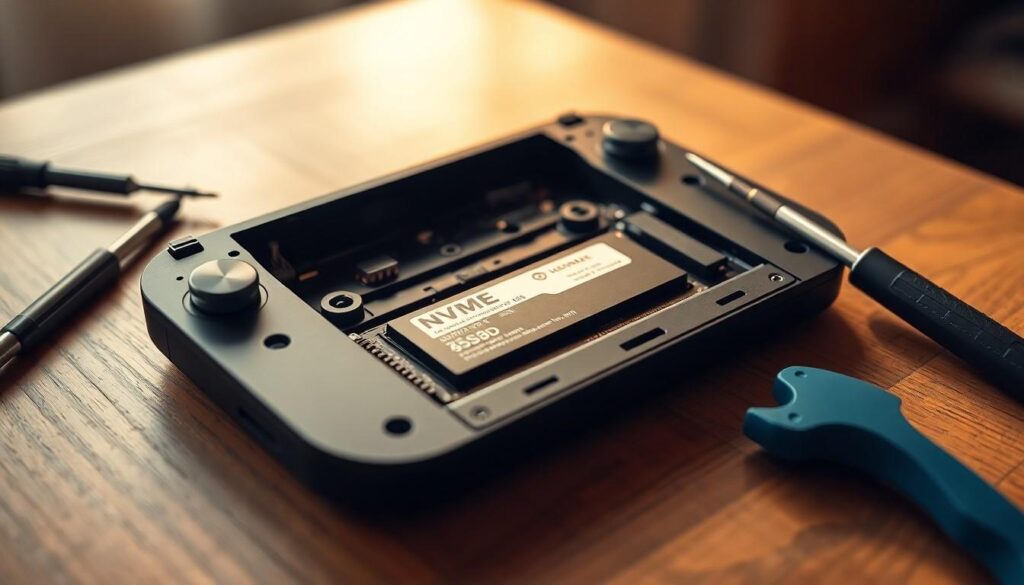
How to Upgrade Steam Deck Storage
Upgrading the storage on a Steam Deck enhances gaming possibilities significantly. Follow these steps for a smooth upgrade experience.
Step-by-Step Guide
- Power down the Steam Deck and unplug it from power.
- Remove the back cover using a plastic spudger, starting from the lower edge to avoid damage.
- Locate the SSD slot once inside. A tiny screw secures the SSD, which requires a screwdriver to remove.
- Insert the new NVMe SSD into the slot firmly until it clicks into place.
- Reassemble the device by securing the back cover and ensuring all screws are tight.
- Power on the Steam Deck and check the storage under settings to confirm the upgrade.
Tools Needed for Upgrade
- Screwdriver suitable for the Steam Deck’s screws.
- Plastic spudger helps prevent damage during removal.
- NVMe SSD offering enhanced read and write speeds for optimal performance.
- Anti-static wrist strap protects components from static electricity.
- MicroSD card optional for additional storage expansion if needed.
With these tools and steps, managing storage on the Steam Deck becomes straightforward.
Tips for Optimizing Storage
Optimizing storage on the Steam Deck enhances game performance and user experience. Here are effective strategies.
Managing Game Downloads
Prioritize downloading essential games first. Large titles often require significant space, so removing unplayed games frees up storage. Keep an eye on game sizes before installation; this ensures they fit within available capacity. Set specific criteria for what to keep versus delete, focusing on games actively played. Regularly check storage usage through the Steam Deck’s interface to stay on top of capacity limits. Utilizing external storage can also help, allowing users to archive titles without deleting them, ensuring access when needed.
Utilizing Cloud Storage Solutions
Consider leveraging cloud storage options to augment local storage. Steam enables cloud saves for games, allowing players to access data without storing it directly on the device. This feature significantly reduces local space usage while retaining progression. For extra convenience, some storage solutions integrate with platforms like Dropbox or Google Drive, providing additional backup options. Regularly backing up game saves protects data against loss. Cloud storage solutions not only save space but also improve flexibility when switching between devices.
Conclusion
Upgrading the Steam Deck’s storage is a game-changer for any serious gamer. By choosing the right storage option users can enjoy faster load times and the ability to download and manage more games effortlessly. Whether opting for an NVMe drive or a MicroSD card the benefits are clear. Enhanced performance and increased capacity lead to a more enjoyable gaming experience.
With the step-by-step guide provided it’s easy to tackle the upgrade process. Players can look forward to a smoother ride through their gaming adventures. Implementing smart storage management strategies further maximizes the device’s potential. Embracing these upgrades ensures that the Steam Deck remains a top-tier gaming device for years to come.